Printed Nike Smoke
3D printing allows us to produce much more detailed parts for scale modeling. Even for relaxed semi-scale modelers, it allows us to add a richness of detail unavailable from HPR kits and difficult to make with other techniques.
However, 3D-printed parts are not yet widely accepted for high-power rocketry because of the wide variance of results, uncertainty about the mechanical properties and unfamiliarity. 3D printing is widely used in model rocketry, where strength is not such an issue, but is still (as of 2023) rare in HPR.
What could I do but give it a try myself? The Nike-Smoke is a perennial favorite, plus there is a lot of detail in the fin can and nose which doesn't usually make it into models. This is the sort of thing that cries out for 3D printing.
After starting this project, I got interesting in testing the mechanical properties of 3D printed components, which resulted in this article: Printed Components.
The Pictures
As always with 3D printing, it took multiple iterations to dial in all parts, but the extra detail is a nice touch, even if the surface finish isn't great.

3D printing is particularly nice for electronics bays, where you can create something custom that fits everything perfectly.

Tony "tfish" Alcocer was kind enough to fly this rocket (and the Honest John 1B) to test out how 3D printed rockets survive L2 HPR flights.
Flight 1
Tony:
"Out at Sierra Rockets Misfits Flat launch site the rocket was prepped. The Easy Mega was setup for Dual apogee events.
This would fire one at apogee and the second event would fire 1 second after apogee.
The charges were ¾ and 1¼ grams in "balloons".
The charges were wired long and placed beneath the recovery gear to blow it "out of the rocket".
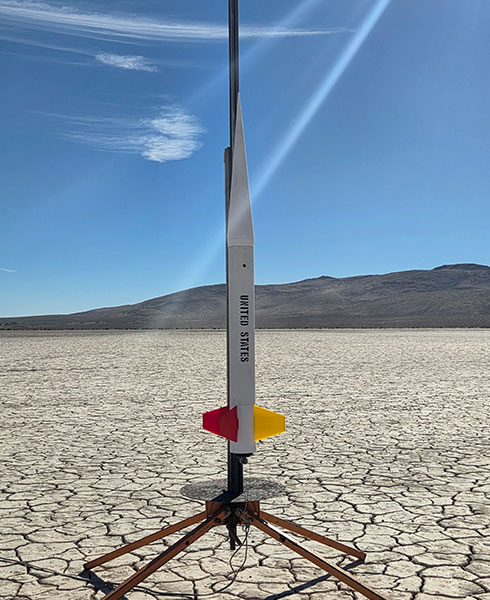
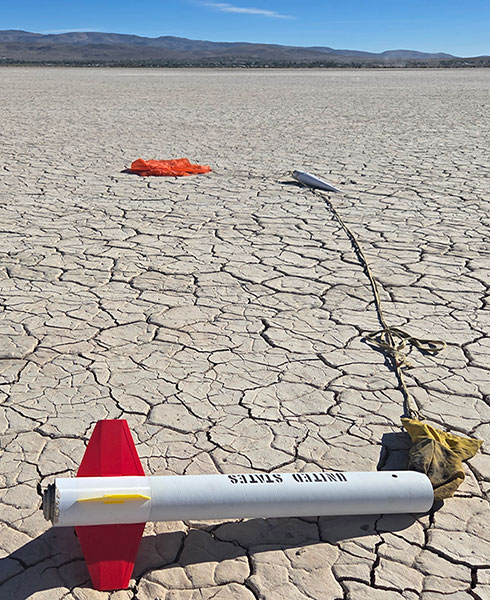
"The AT H123W was chosen to see how the 38mm 2-grain motor would work on 55 ounce rocket… This worked out to 9+ thrust to weight ratio. The rocket left the pad quickly and rose to 1647 feet were the rocket ejected the 40" "flat sheet" chute and landed about 300 feet away at 20 ft/sec. Perfect first flight!"
 |
 |
Flight 2
Tony:
"The second flight was with a 54mm 2 grain Research motor, similar the a
J275W.
The rocket was prepped again and the CP/CG confirmed just under to calibers of stability.
This time the rocket left the pad very quickly and took longer to reach apogee at 5324 feet and landed further out but
still gently at 23 ft/sec.
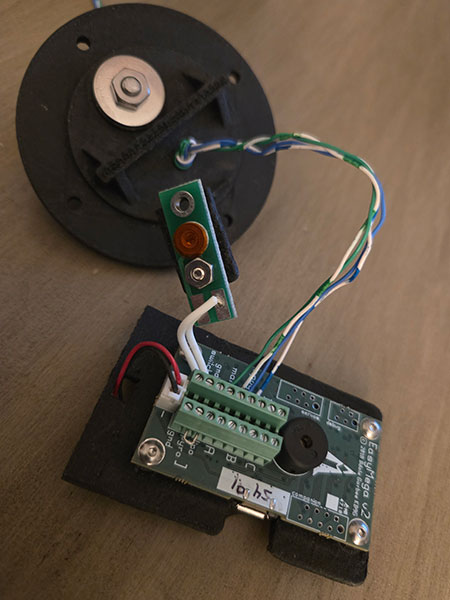
"This is when I noticed that a couple inches of the nose cone had broken off! Evidently the foam balls and epoxy did not make its way done in the ¼" diameter part of the nose cone. The other thing that happened was that the electronics sled had some issues. The altimeter and switch broke free from its base. Not sure of this happened the flight and chute deployment seemed pretty normal. Other then that, it's a great flying rocket that can fly on a simple H motor up the some 54mm motors too!"
Flight 3
Tony:
"At Aeronaut (August 2026) the 3" Nike Smoke flew from the away cell on a
J99.
end burner.
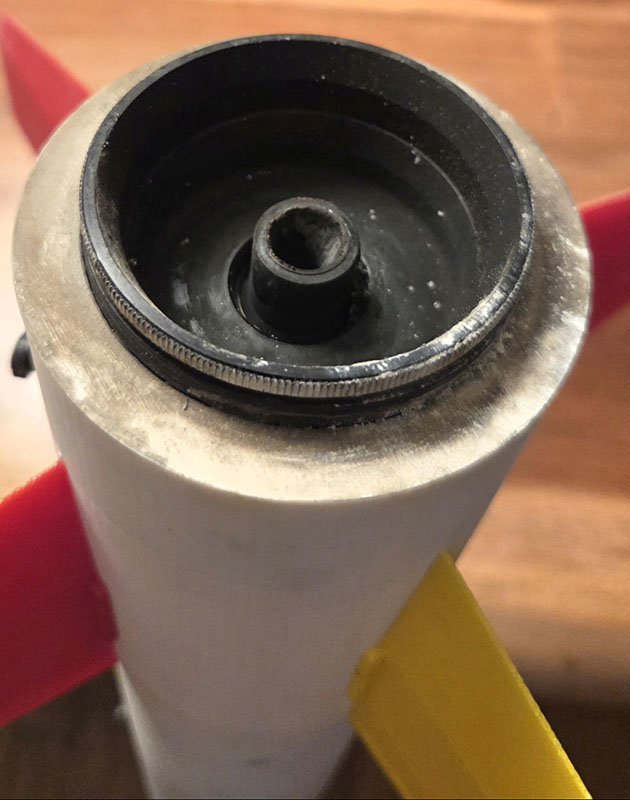
"I followed the instructions for glueing the grain to the liner and using a plug inplace of the smoke grain. With this motor being Warp 9—a smokeless propellant and no tracking smoke made it impossible to get any photos. It had a great 10 second burn and flew to 7472 feet. There was no damage to the aft end of the rocket from the long burn motor."
Love those long burn motors and the J99 is a great test for an L2 rocket. Thanks Tony!
Learnings
Learnings from this rocket:
- The extra aft weight from the 3D printed fin can required nose weight for stability.
- Nose weight requires beefing up the nose. Probably in thickness, but I think in future I will add inner ribs as well.
- The sled needs extra reinforcement. My gussets were too small and I probably should have printed it with 100% infill.
- ABS printed parts are fine for H-J motors, which is great news.
Note though that the printer settings were refined through a lot of testing.
The Design
Since this was to be an HPR rocket, I knew I wanted a 54mm MMT. I also wanted to print the fin can as a single unit on my new (at the time) Bambu Lab X1C. The printable volume (250mm³) limited the fin can size and so I chose a 3" airframe (19% scale). The size also required me to print the nose in 3 sections.
As always, the overall drawing is available, althugh there's not much to it. Since this is 3D-printed, here are the various STL files (also posted on Thingiverse):
These are all designed to fit Giant Leap flexible phenolic tubing (3" airframe and coupler).
The components were printed with ABS at 50% infill. The avbay was printed with PETG-CF at 50% infill. All filament was purchased from Bambu Lab.
Components

Above are all the components. Note that I ended up using a different fin can, printed in three colors, but more on that below.
In order to have maximum flexibility in motor selection, I decided to keep this rocket single-deployment with the avionics in the nose cone. That means an entirely open body. Then why so many tubes?

I wanted the printed fin can to taper down to the OD of the airframe, but not be slid over it. This meant using a coupler and resulted in a aft end assmebly that slid both into the fin can and into the airframe tube. The two centering rings are different because the aft one fits inside the coupler and the forward one inside the airframe tube.

Because the parts were all printed from ABS, normal epoxy bonds were used. Here is the forward CR bonded to the MMT with AeroPoxy ES6209.

I'm also taking advantage of the ability to print much more complex shapes to create a CR that is much thicker than a plywood one would be, but with half its thickness lightened and stiffened with ribs instead of being printed solid.
Nose Cone
The glory of the Nike-Smoke is its nose cone. Not only is the most prominent part of the rocket, it also has the characteristic bulge near the base. In addition, it has patches near the bulge and subtler details all the way up to the cylindrical tip where the actual smoke was ejected.

Because of printer limitations, I had to print the nose in three sections, but was of course able to design integrated couplers between them. One of the breaks was aligned with a prototype detail to hide it.
Fin Can
The Nike fin can is also extremely distinctive. I was able to take advantage of 3D printing to add more details to the profile. Of course there is even more one could do, such as the launch rails and bolt heads.
In the photos above, you see a white fin can, which is what I printed while tuning the design. But for the final print, I took advantage of the ability of the Bambu Lab X1C to print multiple colors.

Because the X1C has only a single extruder, it needs to purge filament for each color change, resulting in a huge amount of waste. (As one review put it: "it poops a lot.")

But even so, the result is great and doesn't require painting!
